- Nederlands, Belgique / België
- Česky, Česká republika
- Deutsch, Deutschland
- Español, España
- English, Europe
- Français, France
- Italiano, Italia
- Magyar, Magyarország
- Nederlands, Nederland
- Deutsch, Österreich
- Polski, Polska
- Română, România
- Français / Deutsch, Suisse / Schweiz
- Svenska, Sverige
- Suomeksi, Suomi
- Türkçe, Türkiye
- English, United Kingdom
- Slovenská, Slovak
- Español, Mexico
-
Worldwide
The quality, reliability and longevity of manufactured products is continuously improving, in addition to enhanced design techniques and developments in material science, this progress is largely due to the use of advanced quality control methods and equipment and the application of tighter dimensional tolerances.
LPE ‘Coordinating’ Quality with Mitutoyo
The quality, reliability and longevity of manufactured products is continuously improving, in addition to enhanced design techniques and developments in material science, this progress is largely due to the use of advanced quality control methods and equipment and the application of tighter dimensional tolerances.
The workhorse of most manufacturers’ inspection departments is the now ubiquitous Coordinate Measuring Machine (CMM). As the need for higher standards of precision grows, so does the requirement for faster inspection speeds to keep-pace with the latest, highly productive machine tools. Manufacturers such as Mitutoyo have responded to these challenges with the introduction of a new generation of CMMs that deliver the required levels of precision and speed.
To make full use of todays advanced CNC CMMs, well-informed manufacturers are now employing highly-efficient techniques such as off-line programing and linking their multiple CMMs into their manufacturing software systems. One such progressive company is Lymington Precision Engineers Co Ltd (LPE).
LPE is a leading manufacturer of precision machined components, fabrications, assemblies and kit sets for the Oil and Gas, Telecommunications, Aerospace and Defence, Land and Sea Systems, Nuclear and Marine industries.
A major employer in the New Forest and surrounding areas with more than 180 members of staff, since 2015 LPE has been owned by Senior plc and operates within the Flexonics division. Continuous investment in the latest machine tools and inspection technology enables the company’s highly skilled workforce to meet customers’ challenging requirements.
“LPE have numerous multi axis CNC machines with turning and milling capability up to 4 meters in length and a Flexible Manufacturing Systems capable of working unmanned 24 hours a day to produce close tolerance components.” Daryll Harris LPE Quality Director explained.
“As well as our ability to manufacture extremely complicated, precise components and assemblies, we pride ourselves in our quality ethos. LPE has developed a quality culture organisation and operating system that relentlessly pursues the elimination of waste, variability and inflexibility.
“Our management system confirms that processes, tools and the capabilities to produce products are consistently in place. It also ensures employees are fully engaged and that they take responsibility for producing quality products, and that they proactively seek opportunities to improve processes”.
To help deliver the company’s quality objects LPE use a wide range of Mitutoyo inspection aids, such as hardness testers and optical measuring equipment. Although, the mainstay of the company’s inspection functions are its 14 Mitutoyo CMMs, including the company’s latest acquisition, an advanced Mitutoyo Crysta-Apex-S122010, CNC machine.
LPE’s Mitutoyo CMMs range from small models located on the shop-floor to large CNC machines with work piece capacities of up to 2m long, 1.0m wide and 0.9m high. Due to the precision of many of LPE manufactured components, most of the company’s CMMs are situated in enclosed, temperature controlled environments.
LPE’s advanced CNC manufacturing capabilities run in parallel with the offline programming of its CMM’s. The use of Virtual Offline MCosmos-3 Softwareallows the utilisation and investigation of CAD models, resulting in data files that can be converted to produce program code for the MCosmos Software. Inspection programming is carried out concurrently with manufacturing to enable reduced lead times to be achieved.
In addition, LPE staff perform on-line programming of CMMs enabling accurate measurement of any component in real time using a 3 dimensional CAD model or an engineering drawing. This provides the capability to compare actual measured results against the CAD model and drawings.
Daryll Harris continued. “The fact that we use 14 Mitutoyo CMMs gives an indication of our huge production capacity and also our company-wide emphasis on quality. To make full use of our advanced CNC CMMs, and to ensure that our inspection routines are able to match the speed and volume of our production, we have an advanced offline CMM programming capability that helps to reduce component lead times. All of our CNC CMMs are also DNC linked to our main server for record and programme retention.”
“Reflecting the diverse nature of our manufactured components, over several years we have purchased a wide range Mitutoyo CMMs with a variety of capacities and accuracy classifications. Our most recently installed machine, a Crysta-Apex-S122010, was purchased to accommodate our larger, high precision parts.
“Our continuing loyalty to Mitutoyo indicates, not only the quality of the company’sCMM hardware and software, it also reflects the outstanding levels of service that we receive from Mitutoyo UK.”

The Mitutoyo Crysta-Apex-S122010, as purchased by LPE, is an advanced CMM that is capable of making very accurate measurements at high speed. The machine represents a future-proof investment for LPE as its probe systems and software can easily be upgraded, or added to at a later date. In short, the CRYSTA-Apex S not only provides precision and speed, it also guarantees flexibility.
The CRYSTA-Apex S is based on proven construction principles that are optimised to reduce any adverse dynamic effects within the system. Dedicated software algorithms guarantee high accuracy by eliminating even the most miniscule of geometrical imperfections in the CMMs guideways.
The machine’s integrated thermal compensation system enables measurement at temperatures varying between 16 and 26°C, by automatically calculating and presenting measurement results as if they were made at the standard reference temperature of 20°C. This system works even when temperature gradients of 1 K per metre and per hour are experienced.
Optional active vibration damping makes it possible to locate this innovative CMM close to a production line, enhancing efficiency by reducing the time taken to transport workpieces to and from the source of inspection.
The CRYSTA-Apex S is equipped with a brand new controller. The UC-400 allows high speed measurements and movements with impressive accuracies, further increasing inspection throughput and saving costs.
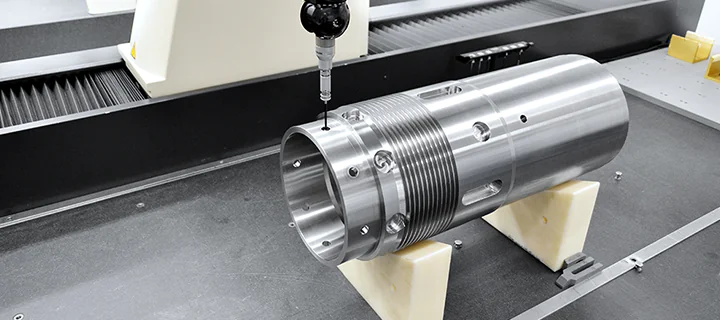
As a fully flexible 3D measuring machine the CRYSTA-Apex S can be equipped with almost any kind of probe, such as, touch-trigger probes, scanning probes and laser scanners such as Mitutoyo’s new SurfaceMeasure
Mitutoyo CMMs are available in a wide range of sizes and accuracy classes and are able to cover practically all precision 3D measuring applications. Each machine represents an excellent investment in terms of productivity, versatility, quality of construction, training and service support.
Drawing on the unparalleled technological expertise of a world leader in metrology, all Mitutoyo CMM components are designed using the latest CAD techniques to ensure maximum performance and are manufactured from materials best suited to the purpose for guaranteed longevity.
Mitutoyo hardware if backed up by comprehensive analysis software, enabling the interpretation of measurement results in the timely manner so essential for keeping up with today’s fast-paced production.


